
When I last posted my layout had moved from one room to another and I had covered the entire thing in plaster cloth. I mentioned that I was building this layout in a way in which I could move it some day and reassemble it elsewhere if need be but at this stage I hadn't yet installed any wiring which made this short move pretty easy. Using 5/32" plywood, foam and ultimately hollow mts keeps the weight down and makes moving these 4 sections very easy on the back.
I had planned on having my steam/diesel mainline rise 4 inches then come back down with the help of Woodland Scenics risers in a 2% grade and a small helix. However, once I laid the track I decided it would be prudent to test some locos going up this grade pulling some rolling stock to make sure it would work before I ended up too much further along in case I needed to rip up some of what I had done. Well thank god I did my test because I could barely get my steam locos (without rolling stock) to climb the first graded curve and I couldn't get them to climb the helix at all. My curves inside the tunnel were much to tight and therefor added too much friction. The wheels would simply slip and the locos would run in place. What to do?
Well, when life gives you helix lemons you make helix lemonade. I determined that I would need much more track to allow a more gradual climb so I added an additional 2' to the end of the table which gave me a larger mountain as well as a new interesting focal point in the form of a curved viaduct.
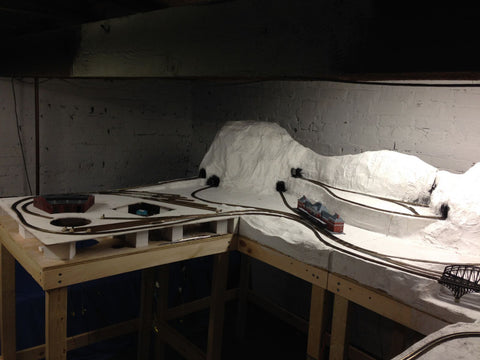
This picture shows the added section before I enclosed it as part of the mountain. You can see the viaduct in place at this point.

The trains run into the tunnel then run in a clockwise direction over the viaduct, through another tunnel then back to the left across that viaduct in the back between the two mountains. One nice aspect of this is a visual thing: the trains disappear into the tunnel for a bit heading in one direction then reappear heading in the opposite direction for a short time, disappear again and end up with a "peek-a-boo" effect in the back. I believe this helps to reduce the toy-like nature of trains running in circles and almost makes it look like two different trains. I think these small illusions are what help bring a life like quality to layouts. I will share some tip and tricks I learned from other modelers in a future blog.
This next picture shows the scene after I had enclosed the mountain, colored the rocks and painted the plaster to get rid of the stark white surface I had been looking at for so long. What a difference a little color makes!

Another added bonus is I was able to extend the run of the coal train up top which can run in whichever direction I want through 4 tunnel portals. At this point I hadn't yet painted the viaduct. I will add a picture of the final product in a future blog.
This next photo shows that same scene from the back. As I mentioned in a previous blog, I wanted to allow as much access to everything inside the mountains because I have a lot of hidden railroad real estate in these mts.

After fixing my problem with getting my locos up a 2% + grade (it was never consistent for the entire run) I then saw another aspect of my original plan that I never really loved. At that point I had my loco run up hill about 4 inches over the course of 8-10 feet or so but coming back down hill was done inside another tunnel on the opposite end of the layout in about 3 feet. Needless to say it was a steep hill downward though a few tests showed that locos would not fly off the track or even move that much faster so it was doable but I didn't love it.
In addition to that, my DC elec line ran through the same mountain then back out again in the opposite direction which looked ok but I lamented the fact that it didn't have quite as much travel over the layout as the steam/diesel line.
This photo shows the mountain in the back where the steam/diesel trains ran (from right to left) into the tunnel then quickly downhill and behind the rail yard. You can also see the two lower tunnels where the elec line ran in the mtn then back out again.
Then a simple thing changed everything. It's hard to see in the photo above but behind the rail yard on the floor is a stack of boat cushions my wife and I have on our sailboat. I store them in the basement over the winter. Well I found a new place to store them which gave me and additional 22" of space behind that side of the table. So what does a model railroader do when given more space in the train room? You build more bench work and expand your layout, that's what you do.
At first I thought I would use the extra space to run the DCC steam/diesel line downhill more gradually and hook up to the outer rack to the left of the rail yard in the last photo but then it hit me (no, not the wooden beam on the ceiling. I have left many scalp cells on that thing, believe me). I decide to create a reversing loop on the new table so the trains could run back down the same hill they came up. I also added a reversing loop behind the rail yard to the left essentially turning this line into one large dog bone. This solved my steep grade down problem but also doubled the size of my layout since now the locos would run in both directions instead of just in a one way loop.
This is a crude drawing showing the 5 separate sections which all come apart and should be able to fit out my basement door if we ever move. Note that this drawing only shows the steam/diesel line. Also note that it shows the two reversing loops kind of separated from each other. The upper loop is actually directly over the lower one as you can see in the second photo.


I am using reverse loop controllers from Azatrax that are also hooked up to the turnouts in them with infrared sensors to automatically throw the turnouts when the trains approach and leave the loop. Each time a loco heads toward a loop it is going to enter it in the opposite direction from the last time which I think adds a little more fun to the whole process.
I have since added mountains in that area which gives me more to scenic and more details to add like maybe a pasture or perhaps a vineyard as my wife and I are big wine drinkers. Also, Germany is known for it's wine so it would certainly fit the theme.
The other nice advantage is I also was able to expand my elec line a little and it now runs onto the new table before heading back to the original route. I can now add another station stop so the trains have another place to travel to.
In my next post, one more issue I couldn't get out of my mind gives me one more expansion opportunity and the benefits of DCC prove to help out a lot. Also, we start talking about decoders for our Z scale engines.